============== Continue from previous post ====================
First we'll put some big data in order to get a bit like the actual loading screen.
The model made with the blender looks fine.
Blender modeling is another area, so let's move on. This post describes the modeling part.
Please note.
============== 이전 포스트에서 이어집니다 ====================
먼저 어느정도 실제 로딩 화면과 비슷하게 가기 위해서 큰 데이터를 넣도록 하겠습니다.
블랜더로 만든 모델이 괜찮다고 보입니다.
블랜더 모델링은 또 다른 분야이므로 넘어가겠습니다. 해당 포스트에 모델링 관련된 부분을 설명해놓았습니다.
참고하시길 바랍니다.

Export-> FBX as follows. In the setting, only the size is 1/100. The fbx transform is said to be 100 times the original size. So 0.01 times to come back to the original size.
다음처럼 export->FBX를 합니다. 설정에서는 크기만 1/100로 합니다. fbx 변환은 원 크기에 100배로 나온다고 합니다. 그래서 0.01배를 해주어야 원래 크기로 나옵니다.

This article is about converting the blender model in libgdx.
libgdx의 블랜더 모델 변환에 관한 글입니다.
https://github.com/libgdx/fbx-conv
libgdx/fbx-conv
Command line utility using the FBX SDK to convert FBX/Collada/Obj files to a custom text/binary format for static, keyframed and skinned meshes. - libgdx/fbx-conv
github.com

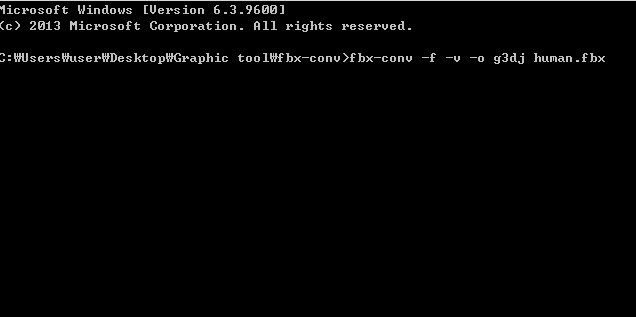
The conversion process.
Now put the converted g3dj file in the assets folder. Then go to the loading page.
변환과정입니다.
자 이제 변환된 g3dj 파일을 assets 폴더에 넣습니다. 그리고 loading 페이지로 넘어갑니다.


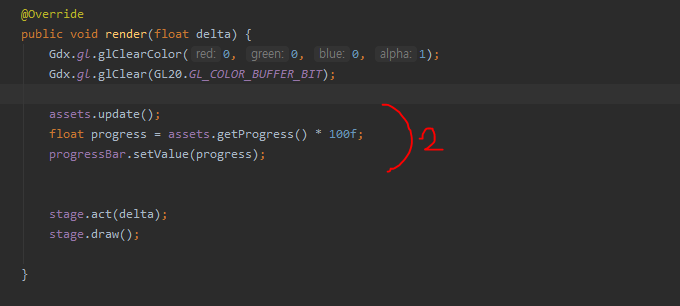
Add the assetManager and position it to load the resource, as in step 1. You can then refresh the progress bar by measuring the execution percentage of assetManager # 2 in rendering. Very easy. Yes, the loading page we implemented through our long blog starts to look the end.
If you run it, the loading bar will appear to move one step. To make it look more practical, let's create several resources. Since we're simulating a run, let's just change the old name of human.g3dj and add it. And after 100%, we'll change the page.
1번처럼 assetManager를 추가하고 위치를 지정해서 해당 리소스를 로딩합니다. 그리고 랜더링에서 2번 assetManager의 실행 퍼센트를 측정해서 progress bar를 refresh 해주면 됩니다. 아주 쉽습니다. 네 긴긴 블로그를 통해 구현한 로딩 페이지가 끝이 보이기 시작합니다.
실행을 해보면 로딩바가 한단계만 움직이는것처럼 보일것입니다. 좀더 실사용처럼 보이게 하기 위해서 리소스를 여러개로 만들어보겠습니다. 실행 시뮬레이션을 하는것이므로 그냥 이전의 human.g3dj의 이름만 바꿔서 추가해보도록 하죠. 그리고 100%가 넘어가면 페이지를 변경해보겠습니다.

Now if you run it, it will run very smoothly.
자 이제 실행시켜보면 아주 부드럽게 실행이 됩니다.

Finally, let's look at the resource dispose.
마지막으로 자원 dispose를 봅시다.

Here the resources used have been dispose. The part to look at is that resource. Instead of disposing the image, the original disposes of a texture called img. myFont disposes the font, not the label. The previous post also disposes the model and instance did not. And if you use skin and asset, you only need to dispose skin and asset. The progress bar with the skin and the model loaded from the asset did not work.
Dispose of memory management, called dispose, can be annoying, but you can expect this to be easier if you use the last skin or assetManager. Because you manage big chunks, not every single one. That's right. In practice, you will most likely use skin or assetManager to gain some speed. Resource management will be more organized and easier.
We finished the loading screen five times. The topic is one topic, but it seems to have covered quite a bit. All you need to do is refer to libgdx's wiki and documentation whenever you need it.
Now let's put the asset manager that we've loaded into the global, and you'll see the basic formula flow as we call it in our new screen. I think the basic settings are good enough.
Attach the model.
여기 사용 자원 dispose 되었습니다. 볼 부분은 해당 자원이라는 것입니다. image를 dispose시킨게 아니라, 그 원본은 img라는 텍스쳐를 dispose 시켰죠. myFont도 font를 dispose했지, label을 dispose한게 아닙니다. 이전 포스트에서도 model을 dispose하고 instance는 그렇지않았습니다. 그리고, skin과 asset을 쓴 요소라면 skin과 asset만 dispose하면 됩니다. skin을 쓴 progress bar와 asset에서 로딩한 model은 하지않았습니다.
dispose라는 메모리관리가 귀찮게도 느껴지는데, 마지막의 skin이나 assetManager를 쓰면 이것이 좀 쉬워질것으로 예상하실수 있습니다. 왜냐면 하나하나를 관리하는게 아니라 큰 덩어리를 관리하니까요. 그렇습니다. 실전에서는 대부분 skin이나 assetManager를 사용하고 그래야 속도면에서 이득을 받을수 있습니다. 리소스 관리가 좀더 정리가 되고 편해질것입니다.
Loading 화면 구현에 대해서 5회에 걸쳐서 마무리 했습니다. 주제는 하나의 주제지만 꽤 많은 내용을 다룬것 같습니다. 필요한 부분은 libgdx의 wiki와 document를 필요할때마다 참고하는면 될것입니다.
이제 로딩을 끝낸 asset manager를 global로 두고, 우리가 새로 펼친 screen에서 부르는 식으로 기본 공식이 흘러갈것을 알수 있을 것입니다. 기본적인 세팅을 충분히 된것으로 생각됩니다.
모델을 첨부합니다.
'LibGdx' 카테고리의 다른 글
| libgdx-collision handling 2 (collision, bullet engine) (1) | 2019.11.18 |
|---|---|
| libgdx-collision handling (collision, bullet engine) (0) | 2019.11.18 |
| libgdx-loading page implementation 4 (basic 3d scene configuration) (0) | 2019.11.16 |
| libgdx-loading page implementation 3 (skin, font) (0) | 2019.11.16 |
| libgdx-loading page implementation 2 (0) | 2019.11.12 |


댓글