Let's make the Jmonkey project from the previous post available in Intellij.
The wiki already says that you can port to various development tools, but there is no automated version yet. So we will use some non-official versions.
이전 포스트의 Jmonkey 프로젝트를 Intellij에서 사용할 수 있도록 해보겠습니다.
이미 wiki에는 각종 개발툴에 포팅이 가능하다고 되어있으나, 자동화된 버전은 아직 없는것 같습니다. 그래서 몇몇 official이 아닌 버전을 이용하도록 하겠습니다.
https://github.com/luna-park/JMonkey3Template
luna-park/JMonkey3Template
Contribute to luna-park/JMonkey3Template development by creating an account on GitHub.
github.com
Jmonkey is a template for Intellij compatible and Android development. Since you're well organized, you won't have a big problem if it's not official.
Download the template, delete the .idea folder, change the project name to whatever you want, and open the root folder of the project in Intellij.
Initially rebuild the error until you have the required sdk or gradle import.
The error will go away, and after a few rebuilds, the "app" will be activated for the play button. This is play for Android.
Connect your phone and try to run it.
Jmonkey를 Intellij에서 호환되고, 안드로이드 개발도 되게 해놓은 템플릿입니다. 잘 정리해놓으셨기 때문에 official은 아니라도 큰 문제가 없을 것입니다.
해당 템플릿을 다운로드 받고, .idea 폴더를 지운후, 프로젝트명은 원하시는데로 바꾸고 Intellij에서 해당 프로젝트의 루트폴더를 엽니다.
초기에 에러가 뜨는 부분은 필요한 sdk나 gradle import가 될때까지 rebuild 를 해주세요.
에러가 사라지고, 몇번 리빌드는 하다보면 플레이버튼에 "app"이 활성화 될것입니다. 이는 안드로이드용 플레이입니다.
휴대폰을 연결하고 실행해봅니다.

It's like the first project in sdk. It's just a texture.
Now let's look at the folder structure.
마치 sdk의 처음 프로젝트같습니다. 텍스쳐만 입혀져있네요.
이제 폴더 구조 좀 보겠습니다.

2. The Game folder in core is the entry point where we start from sdk.
1 is the Android version. You will also see assets set to the library root. This part is Project Assets in sdk.
Now let's paste the source from the previous post.
First we added Level1 to Scenes, so put the Scenes folder inside the assets folder above.
Match Main.java and Level01State.java to the core folder as appropriate.
2번의 core의 Game 폴더가 우리가 sdk에서 시작되는 entry point 입니다.
1번은 안드로이드 버전입니다. assets가 library root 로 지정된 것도 보일겁니다. 이 부분은 sdk에서의 Project Assets 입니다.
그러면 이제 이전 포스트에서의 소스를 붙여보도록 하겠습니다.
먼저 Scenes 에 Level1 을 하나 추가했으니 Scenes폴더를 위의 assets 폴더 안에 넣습니다.
그리고 Main.java, Level01State.java 를 core 폴더에 적당히 매칭시킵니다.

I made it this way, I covered the sauce.
If you import from Level01State part, then there will be no bullet engine part, and you will get an error.
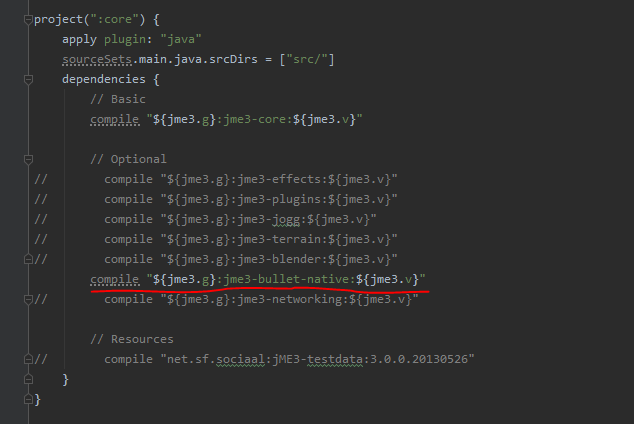
The default template looks like the bullet engine is missing.
Open build.gradle
Open the bullet already commented out.
이런식으로 만들고, 소스를 입혔습니다.
Level01State 부분에서 import를 다 시키면 그때는 bullet engine 관련 부분은 없어서 에러가 뜰것입니다.
기본 템플릿은 불릿엔진은 빠진 상태인 모양이네요.
build.gradle을 엽니다.
이미 미리 주석처리된 bullet 부분을 열어줍니다.


Rebuilding again will eliminate the import problem.
One part of the source has changed. You have to give full gravity.
Now check the results on your phone again.
다시 리빌링시키면 import 문제가 사라집니다.
소스 한부분은 변경되었습니다. 전체 gravity를 줘야합니다.
이제 다시 휴대폰에 결과를 확인해봅니다.

That's good.
There are two Jmonkey related plugins in Configure-> Plugin in intellij. It seems to support model import, but I'm not sure about the other parts. I also recommend sdk development on the wiki, so it's good to complement each other.
잘 되는군요.
intellij 의 Configure->Plugin 에 Jmonkey 관련 플러그인은 2개가 존재합니다. model import는 지원하는것 같은데, 다른 부분은 잘 모르겠네요. wiki에서도 sdk 개발을 추천하고 있으니, 서로 보완을 하며 사용하는게 좋아보입니다.
'Etc' 카테고리의 다른 글
| 개인 정보 처리 방침 (0) | 2020.06.13 |
|---|---|
| Jmonkey base scene initialize (sdk) (0) | 2019.12.03 |
| adMob - reward, libgdx (0) | 2019.11.30 |
| adMob - interstitial, libgdx (0) | 2019.11.30 |
| adMob - banner, libgdx (0) | 2019.11.23 |


댓글