It's too big for me to explain all of the bullet engines, and my skills are not that good. Instead, LibGdx introduced a very good reference to the bullet engine wrapper in the previous chapter. If you don't know LibGdx, don't be too shy and have fun reading. If you come to the level of the program anyway, there is no easy content.
불릿 엔진의 모든 설명을 하기에는 내용상으로 너무 방대하고, 또 저의 실력이 그정도 되지 않습니다. 대신 LibGdx에서 bullet engine wrapper 에 관한 매우 좋은 레퍼런스를 이전 장에서 소개했습니다. LibGdx를 모른다고 너무 투정부리시 마시고 재밌게 읽으시길 바랍니다. 어차피 이정도 프로그램의 수준에 오면 쉬운 내용은 없습니다. ㅎㅎ lol
https://xoppa.github.io/blog/using-the-libgdx-3d-physics-bullet-wrapper-part1/
Using the libGDX 3D physics Bullet wrapper - part1 | blog.xoppa.com
Many 3D games require some sort of collision detection between 3D objects. Sometimes it's possible to do this with some basic math and bounding boxes and...
xoppa.github.io
Once you've studied the reference, don't get too caught up in the parts you don't understand.
I'm going to implement it this way.
1. Visually identify the collision object.
2. Basically you can add mixed objects.
Meaning 1 means that if there is an object like the one below, it draws a border to know its collision range.
일단 레퍼런스를 공부하셨다면, 내용이 이해가 안되는 부분에 너무 사로잡히지말고, 구현을 하면서 이해를 해봅시다.
저는 일단 이런식으로 구현할 생각입니다.
1. 충돌 물체를 시각적으로 확인할수 있다.
2. 기본적으로 혼합개체를 추가할수 있다.
1번의 의미는 아래처럼 물체가 있다면 그것의 충돌 범위를 알수 있게 테두리를 그려준다는 의미입니다.

Meaning 2 means that we will use compoundShape to cover not only the basic shape but also various shapes.
compoundShape can have multiple default shapes. Then you can combine spheres and hexagons to handle complex shapes.
The implementation does not have to be this way.
2번의 의미는 기본 모양뿐 아니라 다양한 모양을 커버할수 있도록, compoundShape를 사용하겠다는 말입니다.
compoundShape는 기본 shape를 여러개 가질수 있습니다. 그러면 구형과 육각형을 합성하면 복잡한 모양을 다룰수 있겠죠.
구현을 꼭 이런식으로 안해도 됩니다.
First, let's implement a simple object provided by three js.
Let's create a class template called PrimitiveModel.js. (Note that I wrote the model as model, but it is implementation specific. It is just a name.)
자 먼저 three js 제공의 간단한 물체를 구현해봅시다.
PrimitiveModel.js 라는 class 틀을 만들어봅시다. ( 참고로 이름은 model로 썼지만, 구현상 instance에 해당됩니다. 단지 이름일뿐입니다)
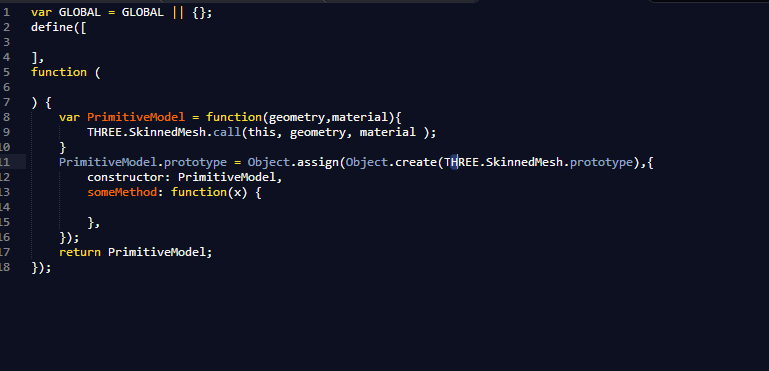
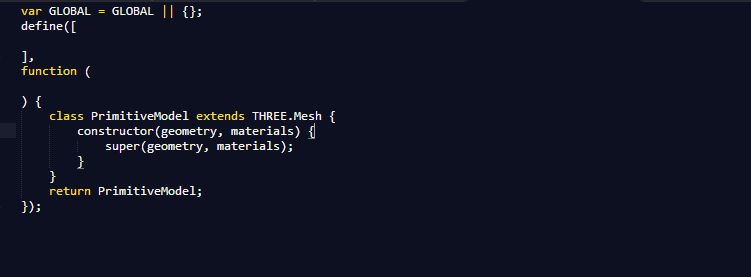
This is the basic framework of a class called PrimitiveModel that inherits SkinnedMesh with an es5 shape.
But since it is the es6 era, I will write it as es6.
es5 모양으로 SkinnedMesh를 상속하는 PrimitiveModel이라는 class의 기본 틀입니다.
근데, es6 시대가 됐으니까 es6로 쓰도록 하겠습니다.
Let's put one sphere and one box in the mainPage as a primitiveModel.
mainPage에 구형하나와 박스 하나를 primitiveModel로 넣어보죠.
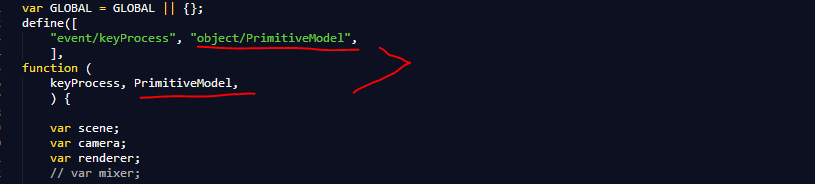
At the top, import PrimitiveModel.
상단에 이렇게 PrimitiveModel을 import 합니다.
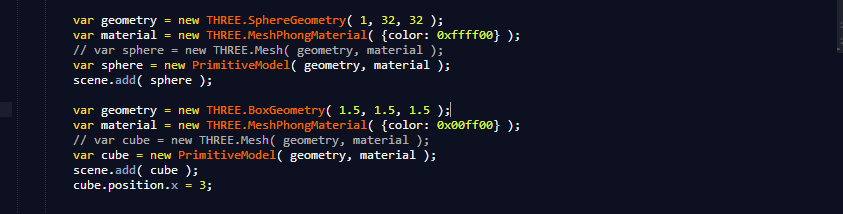
And if you add it like this, the output looks like the first picture in this post. It's nothing unusual.
그리고, 이렇게 추가하면 이 포스트의 첫 그림과 같은 모양이 출력됩니다. 전혀 이상없죠.
===========================================================================
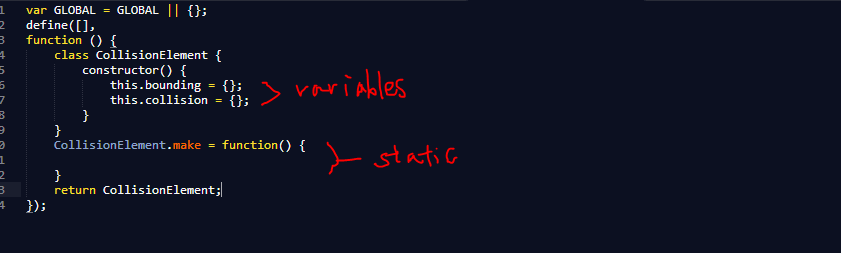
Let's add another object in this state. The name is CollisionElement. The basic framework of the implementation is to return the most basic shapes such as boxes, spheres, triangular pyramids, and cylinders, and to call each from PrimitiveModel and use it for each individual model.
bounding is a frame created by line. Collision puts the shape of a bullet that represents the actual collision object.
Actual javascript does not declare the privite variable of the class. In other words, bounding or collision can be used immediately. In other words, you don't have to put an empty variable like I did. I've allocated an empty object {} for clarity. Please do not make a mistake.
The second part of the static expression is similar to the static method in java. In fact, after declaring a class in javascript, you can use it like a static method by associating a method with the class name this way. If you have another way, you can use that.
이 상태에서 또다른 object를 추가해봅시다. 이름은 CollisionElement 입니다. 박스, 구형, 삼각뿔, 원통 등의 가장 기본적인 모양을 요기서 return 해주고, PrimitiveModel에서 각각을 불러서 개별 모델마다 사용하는게 구현의 기본틀입니다.
bounding 은 line으로 만든 시각틀입니다. collision은 실제 충돌 물체를 나타내는 bullet의 shape를 넣어줍니다.
실제 javascript는 클래스의 privite 변수를 선언하지 않습니다. 즉 bounding이나 collision은 사용할때 바로 쓰면 됩니다. 즉 제가 한것처럼 빈 변수를 넣어줄 필요는 없습니다. 저는 알아보기 좋게 빈 객체 {} 를 할당한겁니다. 착오없으시길 바랍니다.
두번째 static이라고 표현한 부분은, java의 static 메서드와 비슷한 것입니다. 실제로 javascript에서 클래스를 선언해주고 난뒤에, 클래스 이름에 바로 이런식으로 메서드를 연결하면 static 메서드처럼 사용이 가능합니다. 다른 방법이 있으면 그렇게 쓰셔도 됩니다.
===========================================================================
Next, let's summarize the basic meshes to use.
BybtBoxShape => BoxGeometry
2. btSphereShape => SphereGeometry
3. btCylinderShape => CylinderGeometry
-> Rectangle, sphere, cylinder shape respectively. On the right is the corresponding mesh geometry in three.js.
4. btConvexHullShape
-> This function creates a convex shape. Adding a point creates a shape based on the convex shape along that point.
Let's code inside CollisionElement.make.
다음으로 사용할 기본 Mesh들을 정리해 봅시다.
1. bybtBoxShape => BoxGeometry
2. btSphereShape => SphereGeometry
3. btCylinderShape => CylinderGeometry
-> 각각 사각형, 구형, 실린더 모양입니다. 우측은 그에 대응하는 three.js의 메쉬 지오메트리 입니다.
4. btConvexHullShape
-> 이는 볼록 모양 shape를 만들어주는 함수입니다. 점을 추가시키면 그 점을 따라 볼록한 모양 기준으로 shape를 만듭니다.
CollisionElement.make 내부를 코딩해보겠습니다.

Line 15 is called CollisionElement.make ("box", ...) this way and it will be the first argument. Name
Line 16 receives the required numbers after the 'name' argument, which depends on the shape.
line 19: bounding_geometry, geometry varies depending on the type of call, defines a variable that accepts it
line 20: bounding_material is commonly red and wireframe.
Then branch according to the type of name,
The number of numbers required depends on the type of name. Check it out,
line 15는 CollisionElement.make("box", ... ) 이런식으로 호출을 하면 첫번째 argument를 받는 부분이 되겠다. 즉 이름
line 16은 'name' argument 이후로는 필요한 수치를 받는데, 각 모양에 따라 받는 숫자는 달라지게 됨.
line 19 : bounding_geometry , 호출 형태에 따라 지오메트리가 달라지는데, 그걸 받아주는 변수를 정의
line 20 : bounding_material은 공통으로 빨간색, wireframe으로 합니다.
그다음 name의 종류에 따라 분기하는데,
name의 종류에 따라 필요로 하는 수치의 숫자가 다릅니다. 그걸 확인해주고,
} else if (name == "box") {
if (point.length != 3) throw exception;
bounding_geometry = new THREE.BoxGeometry( point[0], point[1], point[2] );
node = new THREE.Mesh( bounding_geometry, bounding_material );
newElement.bounding = node;
newElement.collision = new Ammo.btBoxShape(new Ammo.btVector3(point[0] / 2, point[1] / 2, point[2] / 2));
For example, in case of "box", make the shape in bounding / collision variable as above.
There are four custom implementations of "diamond", "sadari", "arrow", and "(free form)".
For example, "sadari"-(Trapezoid) is implemented like this.
If CollisionElement.make ("sadari", width_up, width_down, height, offset, depth_up, depth_down, offset1, offset2, offset3, offset4); It is like this.
예를 들어 "box"일경우는 위처럼 각각 bounding/collision 변수에 해당 모양을 만들어 넣어줍니다.
개인적으로 만든 구현은 "diamond", "sadari", "arrow", "(free form)" 4가지가 있다.
예를 들어 "sadari"-(Trapezoid) 는 구현은 이렇게 되어있다.
만약, CollisionElement.make("sadari", width_up, width_down, height, offset, depth_up, depth_down, offset1, offset2, offset3, offset4) ; 이렇게 되어있다.
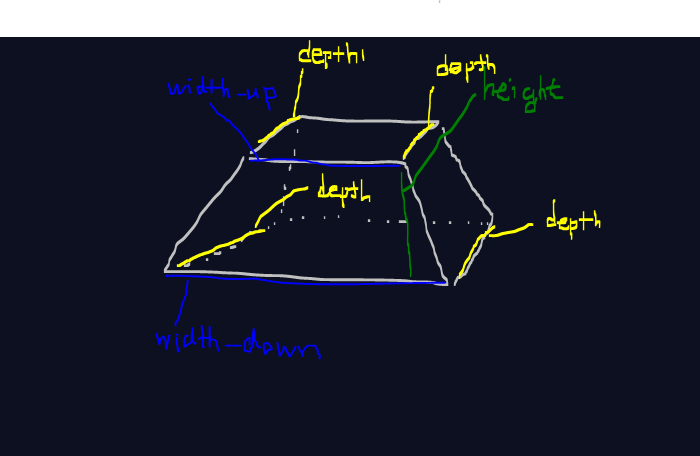
offset is the offset by which width_up moves left and right, offset1 / offset2 / offset3 / offset4 means the offset by which depth1 / depth2 / depth3 / depth4 can move back and forth.
If you implement like this
return_value = CollisionElement.make ("box", 2,2,2);
If you receive a return_value with visual bounding and collision collision.
offset은 width_up이 좌우로 움직이는 오프셋이고, offset1/offset2/offset3/offset4 는 depth1/depth2/depth3/depth4 가 앞뒤로 움직일수 있는 오프셋을 의미합니다.
이렇게 구현을 해서
return_value = CollisionElement.make("box",2,2,2);
이라면 시각요소 bounding과 충돌요소 collision을 가진 return_value를 받을수 있습니다.
===========================================================================
Leads to the next chapter
다음장으로 이어집니다
'Three.js' 카테고리의 다른 글
| Three.js-collision and bullet engine, ammo -part4 (0) | 2019.10.22 |
|---|---|
| Three.js-collision, bullet engine, ammo -part3 (0) | 2019.10.22 |
| Three.js-collision and bullet engine, ammo -part1 (0) | 2019.10.15 |
| Three.js - Animation system (0) | 2019.10.15 |
| Three.js-key event (0) | 2019.10.10 |


댓글